Checklists
Move-In and Move-Out Inspection Checklist With Photos (2026)
A room-by-room move-in and move-out inspection checklist with photo tips, wear and tear vs damage, deposit rules by state and province, and a signed report.
By Bibin MathewUpdated 19 min read
The short answer
Walk every room at move-in and move-out in the same order, take a wide photo of each wall and floor plus close-ups of anything worn or damaged, and write it all on a condition report that both sides sign. Have the tenant add their own photos in the first few days, keep the originals for the whole tenancy, and compare the two sets room by room at move-out. Deduct only for damage beyond normal wear and tear, and follow your state or province's deadline and itemization rules, which differ widely.
Most security deposit disputes are not really about the carpet or the scuffed wall. They are about proof. The landlord says the stain was new. The tenant says it was there on day one. Without dated photos and a signed report, it is one memory against another.
The fix is boring and reliable: a written move-in inspection, photos taken the same way at the start and the end, and a short report both sides sign.
This guide is for landlords and property managers in the US and Canada, and for tenants who want to protect their deposit. It covers a room-by-room checklist, how to take photos that hold up in a dispute, getting tenants to document the unit themselves, wear and tear versus damage, and real examples of how deposit rules differ by state and province. It also shows how to run the photos through one private link in Tangentflow, the same way many landlords already collect rental application documents, though a clipboard and a phone camera work too.
Why move-in and move-out documentation breaks down
Most landlords do take some photos. The problems are in how.
- Photos are taken in a rush. Half the rooms missed, nothing close up.
- Move-in and move-out photos do not match. Different angles and order, so nobody can compare them.
- No written report. Photos show a mark but not whether anyone agreed it was there.
- The tenant never adds anything. They notice the cracked tile in week two and mention it by text, if at all.
- Photos live on one person's phone, which gets replaced or leaves with the leasing agent.
- Deadlines sneak up. Several states give you only two or three weeks after move-out to send an itemized statement.
The room-by-room move-in move-out inspection checklist
Use the same list at move-in and move-out. Walk the unit in the same order each time, starting at the front door and moving clockwise, so the two sets of photos line up.
| Area | What to photograph | What to note on the report |
|---|---|---|
| Entry and hallways | Front door inside and out, lock, floor, each wall, light fixtures | Door and lock condition, scuffs, floor wear |
| Living room | Each wall, floor, ceiling, windows and blinds, outlets and switch plates | Wall marks, nail holes, carpet or floor condition, window screens |
| Kitchen | Each wall, floor, countertops, cabinets open and closed, inside each appliance, sink and faucet | Burns, chips, stains, appliance condition, missing shelves or racks |
| Bathroom(s) | Tub or shower, toilet, sink and vanity, mirror, floor, exhaust fan, tile and grout | Cracks, mold or mildew, caulk condition, leaks, fixture damage |
| Bedrooms | Each wall, floor, closet with doors open, windows and blinds | Carpet stains, holes, closet doors and tracks, window coverings |
| Laundry | Washer and dryer inside and out, hookups, floor | Working condition, lint trap, signs of leaks |
| Windows and doors | Each window, screen and lock; interior doors and hardware | Cracked glass, torn screens, broken locks |
| Heating, cooling and safety | Thermostat, smoke and carbon monoxide alarms, fire extinguisher, furnace filter if accessible | Alarms present and tested, filter date |
| Outdoor areas | Balcony, patio or deck, yard, fences, parking space, storage locker | Damage, debris, landscaping condition if the tenant maintains it |
| Utilities | Electricity, gas and water meters | Readings, for the final utility handover |
| Keys and access | All keys, fobs, garage remotes and mailbox keys laid out together | Count of each, which ones were returned |
Give extra care to the areas that cause most arguments: carpet and flooring (note the carpet's age if you know it), walls (nail holes and scuffs are frequent sticking points), inside appliances (cleaning charges come down to what they looked like on day one) and bathroom caulk and grout. Every pre-existing problem gets a wide photo for location, a close-up and a line on the report.
How to take photos that hold up in a deposit dispute
A photo is only useful if someone months later can tell where it was taken, when, and what it shows.
Wide first, then close, same order every time
For every room, take a wide shot from the doorway, then each wall and the floor. For damage, take one photo showing where it is and one close-up with a coin or tape measure for scale; a close-up alone could be any wall in any unit. At move-out, stand where you stood at move-in and follow the same order. Turn on every light, open the blinds and check each photo before moving on.
Timestamps and metadata, with a caveat
Phones record when a photo was taken in the file's metadata (often called EXIF). Do not rely on it alone: it can be wrong or edited, it is often stripped when photos are texted or resized by an upload tool, and screenshots lose it entirely. Better evidence is several things that agree: the original files kept unchanged, a record of when they were sent or uploaded, a signed and dated report, and a video that states the date. Keep the originals somewhere you control for the whole tenancy and beyond.
Add a video walkthrough
A slow video walk through the unit shows how the rooms connect and that nothing was skipped.
- Say the date, the address and the unit number at the start.
- Walk slowly, narrate ("Living room, small scuff next to the window") and open closets, cabinets and appliances on camera.
- Keep it in one take if you can. One continuous video is harder to question than a series of clips.
Video does not replace photos. Close-up stills are easier to compare and to attach to an itemized statement.
Let tenants document the unit at move-in
Even a careful landlord misses things. The tenant will notice the sticky drawer and the hairline crack in the tub in the first week, so ask them to document it.
- Give them a short window, such as three to seven days after key handover, in writing.
- Give them the same room list you used, so their photos line up with yours.
- Ask for notes, not just photos. "Anything to note?" catches the dripping faucet a photo cannot show.
- Add what they send to the report as tenant-noted items, and confirm receipt with a dated reply.
This protects the landlord too. A tenant who had the chance to document the unit and did not use it has a harder time claiming damage was there all along.
Remote move-out inspections
Not every tenant can be there for the final walk-through. A remote move-out inspection can fill the gap:
- Ask the tenant to photograph every room before returning the keys, using the move-in room list, plus a short video with the date stated at the start.
- Ask for the keys and remotes laid out in one photo.
- Do your own inspection and photos right after, before any cleaning or repairs.
Tenant photos are a strong supplement, but some jurisdictions require the landlord's own photos or a joint inspection, as California does (below). Check your local rules before relying on tenant photos alone.
Normal wear and tear vs. damage
Most deposit laws allow deductions for damage but not for normal or ordinary wear and tear. The exact line depends on your jurisdiction, the length of the tenancy and the age of the item; these examples show how it is commonly drawn.
| Usually normal wear and tear | Usually damage |
|---|---|
| Light scuffs and a few small nail holes from hanging pictures | Large holes, many anchor holes, or holes from mounting a TV without permission |
| Faded paint or sun-faded blinds | Crayon, marker or unapproved paint colors |
| Carpet worn along walking paths | Burns, pet stains, rips or large permanent stains |
| Minor scratches on wood floors | Deep gouges, water damage from a left-open window |
| Loose door handles or a sticky lock from use | Broken doors, kicked-in panels, lost keys requiring a rekey |
| A few small pet scratches on a door after years of an approved pet | Chewed trim, scratched-through doors, pet odor needing treatment |
Two things decide the column: how long the tenant lived there and whether it was already there at move-in, which is exactly what your move-in photos answer.
Deposit rules vary by state and province: four examples
Deadlines, caps, inspections and itemization rules differ a lot, and some cities add their own. Here are four examples, checked against official sources in October 2026. Check the current rules for your own state, province and city.
| Jurisdiction | Deposit return deadline | Itemization and documentation | Inspection rules |
|---|---|---|---|
| California | 21 days after the tenant moves out | Itemized statement with receipts or invoices for repairs; photos required (see below) | Landlord must tell the tenant of the right to an initial inspection in the two weeks before move-out |
| New York | 14 days after the tenant vacates | Itemized statement of any amount kept; missing the deadline forfeits the right to keep any of it | Landlord must offer a pre-move-in inspection; tenant can request one 1 to 2 weeks before move-out |
| British Columbia | 15 days after the later of the tenancy ending and receiving the forwarding address in writing | Keep part only with the tenant's written agreement or by applying for dispute resolution | Joint move-in and move-out condition inspections with a written report |
| Ontario | Not applicable: no damage deposits | Only a last month's rent deposit is allowed | Damage claims go to the Landlord and Tenant Board |
California
Under Civil Code section 1950.5, the landlord has 21 days after move-out to send an itemized statement and return the rest, with the bill or a description of work done for each repair (California Attorney General guide). AB 2801, signed in 2024, added photo requirements: from April 1, 2025, landlords must photograph the unit after it is returned and before repairs or cleaning they will deduct for, and again after; for tenancies starting on or after July 1, 2025, also at the start of the tenancy. The photos go to the tenant with the itemized statement.
New York
General Obligations Law section 7-108 caps most deposits at one month's rent and requires an itemized statement within 14 days after the tenant vacates, or the landlord forfeits the right to keep any of it. If the tenant accepts the offered move-in inspection, both sign a written agreement noting existing defects, and the landlord cannot later deduct for anything listed. Deductions for ordinary wear and tear are not allowed.
British Columbia
BC requires a joint move-in condition inspection recorded on form RTB-27, and a matching one at move-out. A landlord who does not offer two opportunities, complete the report or give the tenant a copy within seven days can lose the right to claim against the deposit for damage, and the province encourages both sides to take plenty of photos and videos. After move-out, the landlord has 15 days to return the deposit, keep an amount the tenant agreed to in writing, or apply for dispute resolution.
Ontario
Under the Residential Tenancies Act, a landlord can collect a rent deposit of no more than one month's rent, usable only for the last rental period, not repairs. For tenant damage, the landlord applies to the Landlord and Tenant Board. Photos still matter; they become evidence for that application instead of support for a deduction.
The condition report and signatures
Photos show what the unit looked like. The condition report shows what both sides agreed it looked like. Use your jurisdiction's form if it has one (like BC's RTB-27) or your landlord association's. A good report includes:
- Address, unit, tenant names and inspection date.
- A row for each area, with move-in and move-out condition columns side by side and room for comments.
- Meter readings and a key count.
- A reference to the photo set, such as "Move-in photos, 64 files, uploaded October 3."
- Signatures and dates from the landlord or agent and each tenant, at move-in and move-out, with space for the tenant to note anything they disagree with.
Give the tenant a copy right away; some jurisdictions set a deadline for it.
How to collect move-in and move-out photos in Tangentflow, step by step
Tangentflow turns your room list into one private link per tenant. Each photo is checked as it arrives, and an AI collection agent sends the invitation, answers questions and reminds the tenant about missing rooms.
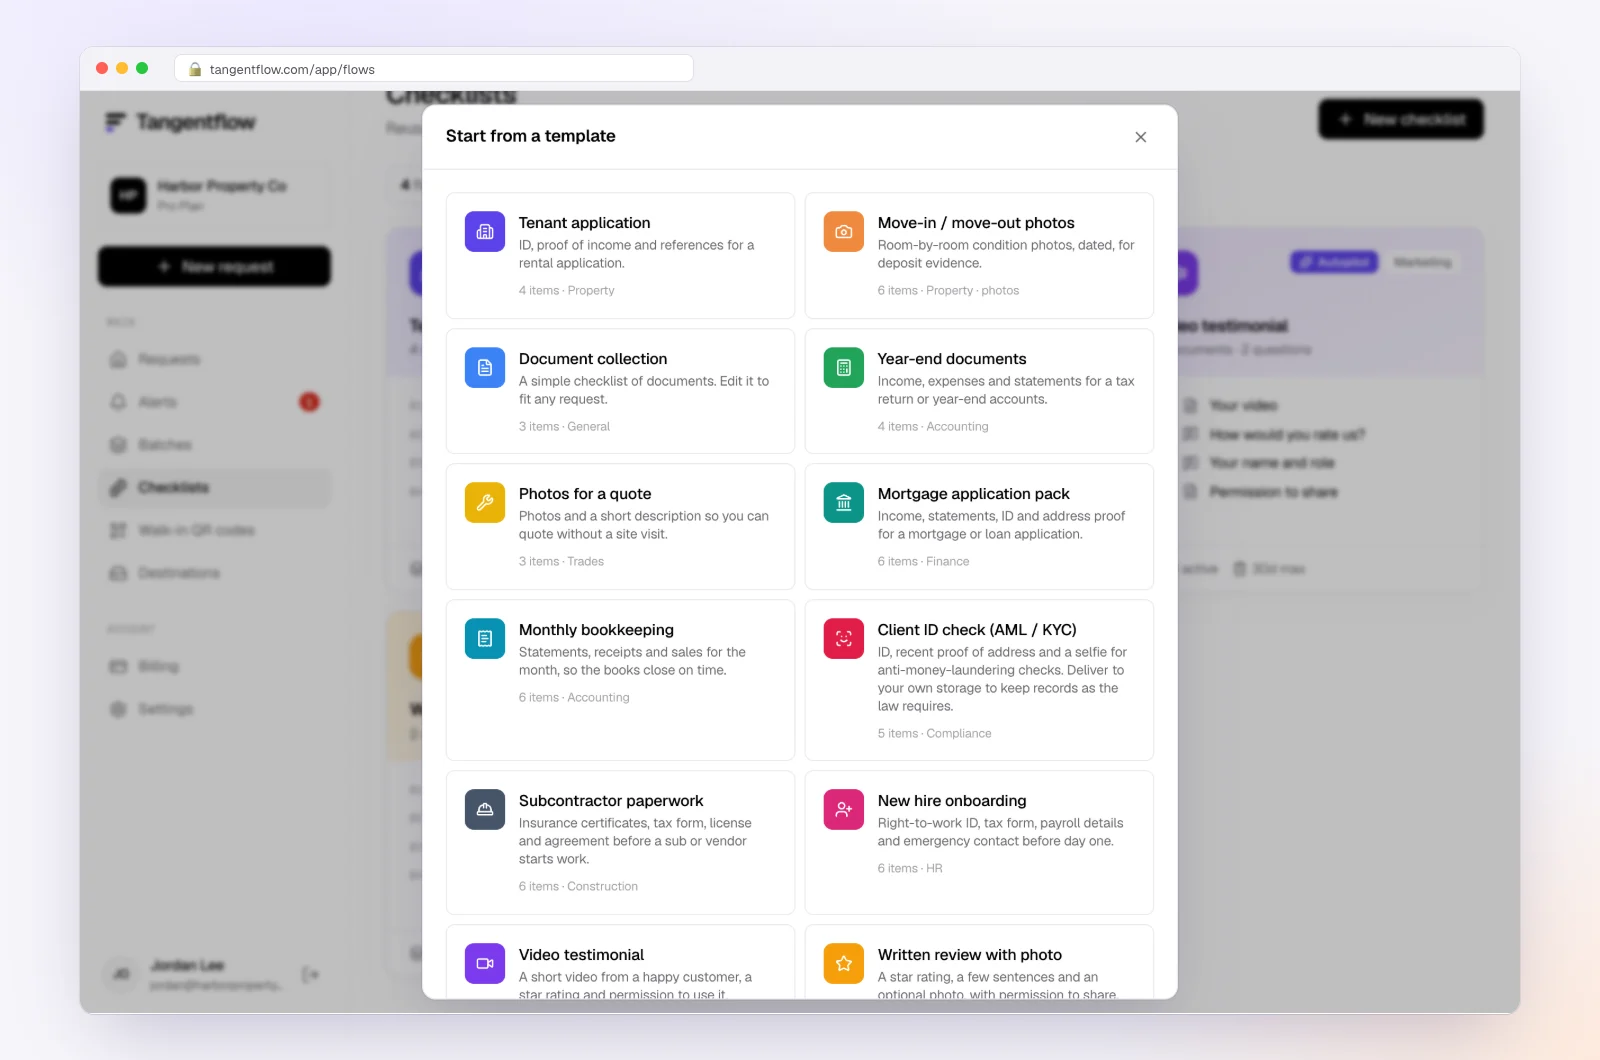
1. Start from the Move-in / move-out photos template
Go to Checklists, click "Browse templates" and pick Move-in / move-out photos. It starts you with the instruction "Take clear, well-lit photos of each area. Include walls, floors and any damage." and these items:
- Kitchen: at least 3 angles, including appliances.
- Living room: at least 2 angles.
- Bathroom: at least 2 angles.
- Bedrooms: at least 2 photos per bedroom.
- Meter readings: electricity, gas and water meters, readable.
- Anything to note?: an optional question for existing damage or issues.
2. Make it match your units
Open each item in the checklist editor. Add rooms the template does not include, such as "Entry and hallways," "Laundry," "Balcony or patio" and "Keys and remotes." Raise "At least" if you want one photo per wall. Fill in "What should it be?" (the AI check uses it), a "Tip for the customer" like "Turn on all the lights and open the blinds," an "Example", and "Section heading" to group items into "Inside" and "Outside."
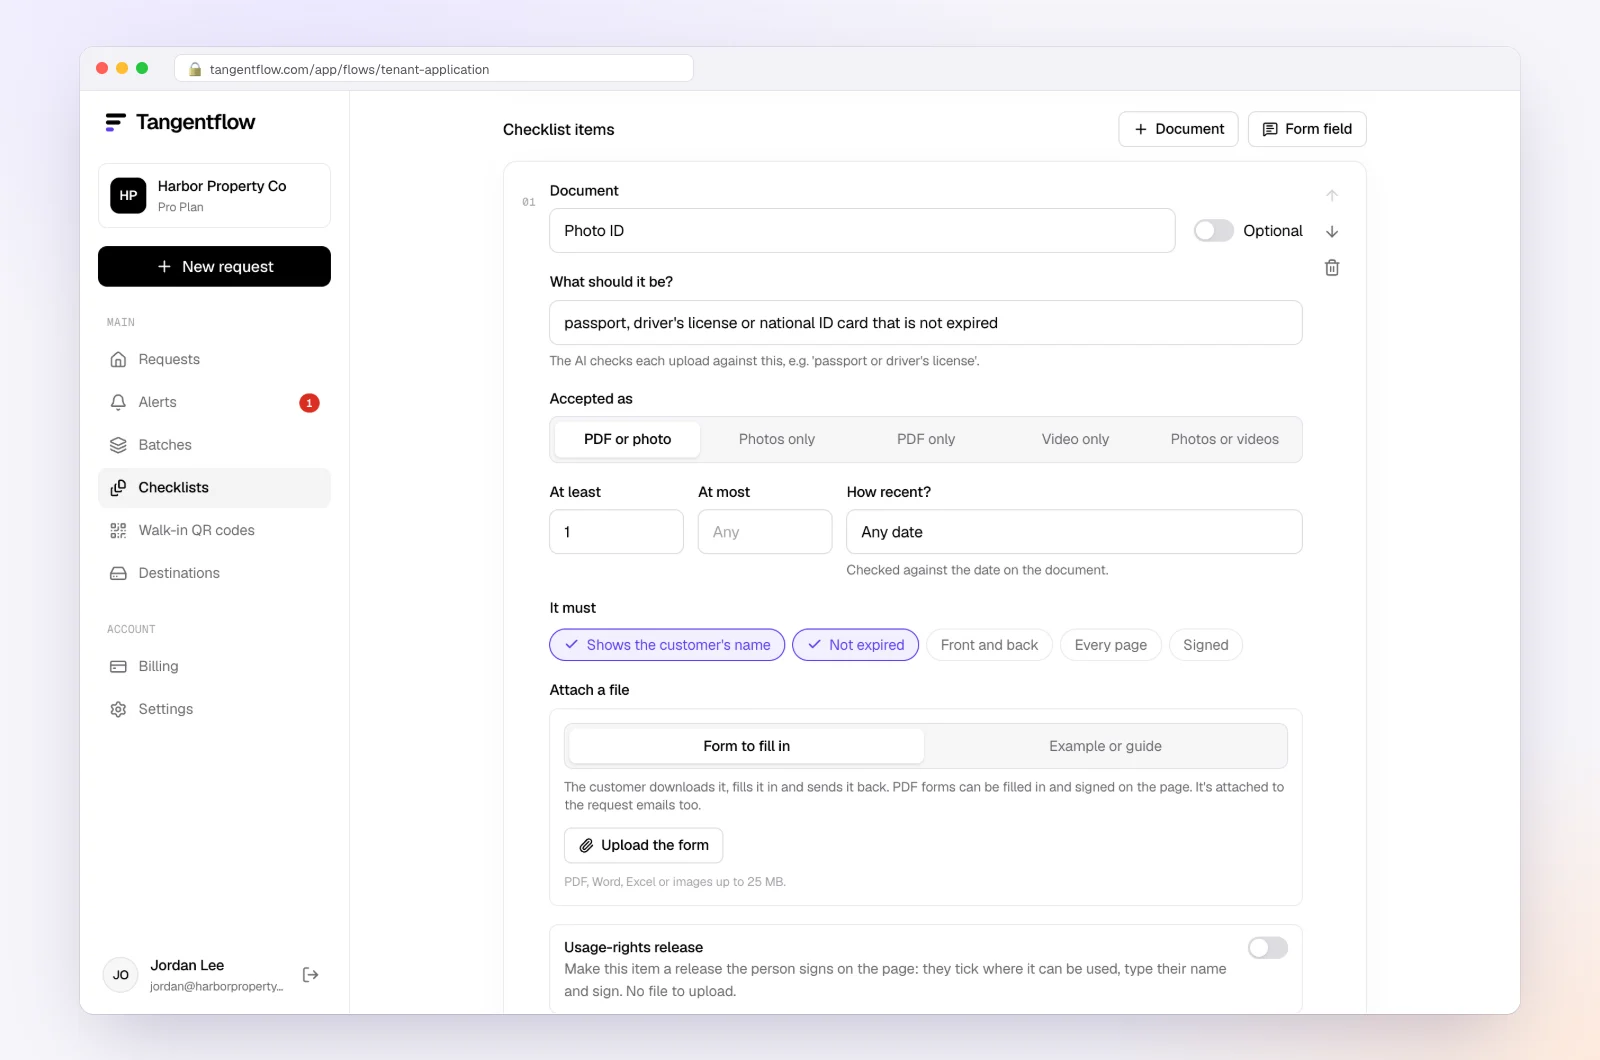
For a video walkthrough, add an item set to "Video only" with a minimum and maximum length and "Questions to answer on camera" such as "Say today's date and your unit number." Add form fields for the move-in date and keys received, and use "Only ask if…" to show "Balcony or patio" only when the tenant says they have one.
3. Attach your condition report to sign
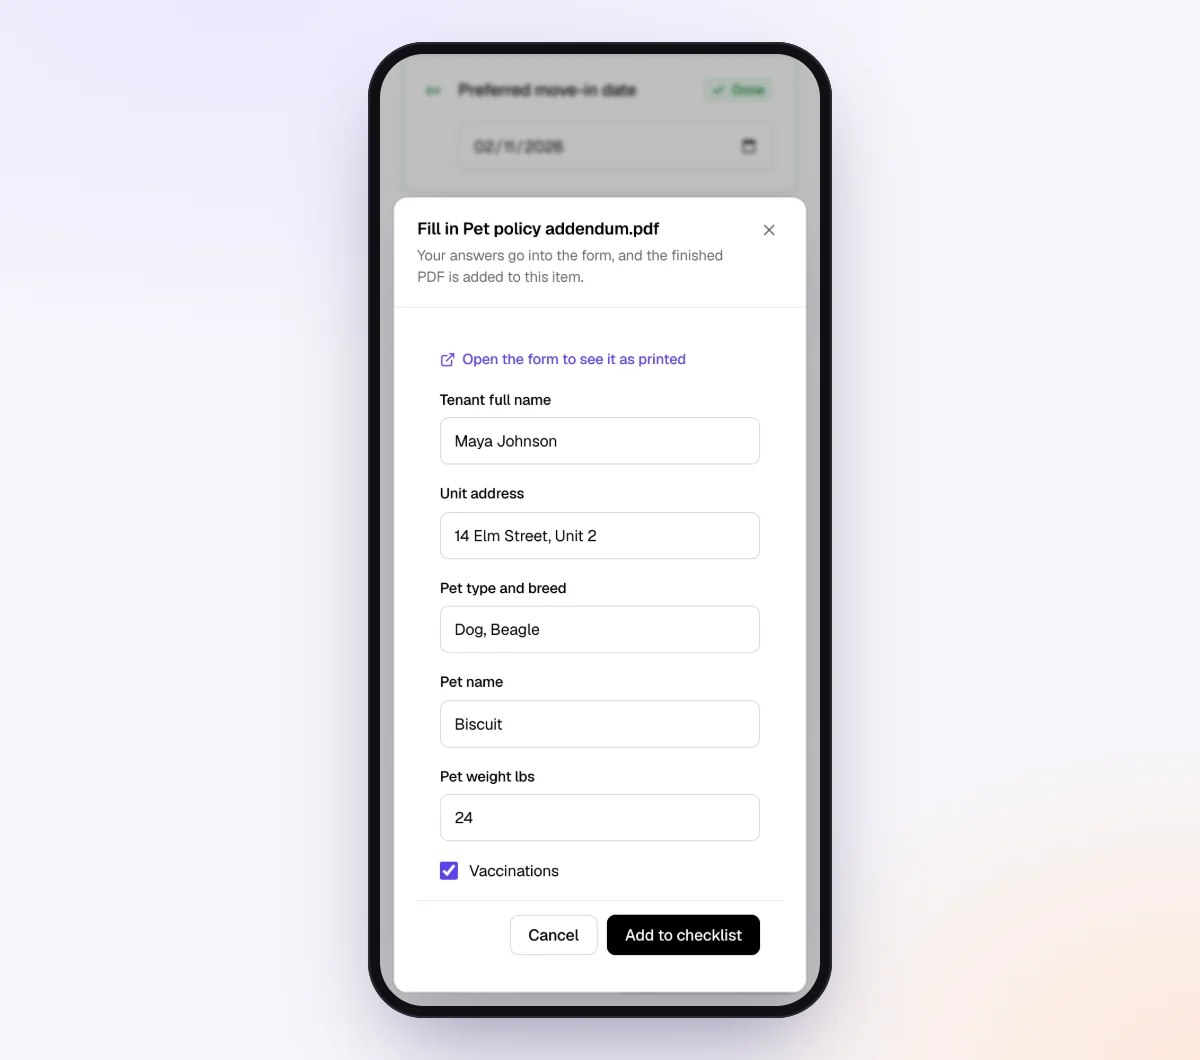
Attach your condition report to an item as a fillable PDF. The tenant fills it in and signs with a drawn signature in the browser, and the signed PDF is filed with the photos. More in forms and e-signatures.
4. Send the request on lease day
Go to Requests, click "New request," choose the checklist, and add a reference such as "14 Elm Street, Unit 2, move-in," the tenant's name and email, and a needed-by date a few days out. Leave "Email the link" on and the agent sends a branded invitation from your business name, or copy the link into your own text, or click "Show full screen" for a QR code.
Photos of someone's home are personal, so consider "Require an email code": the tenant enters a 6-digit code sent to their email before the link opens.
5. The tenant uploads room by room
The tenant opens the link in any phone browser, with no account or app, sees which rooms are done and missing, and uploads from the camera. They can come back to the same link later.
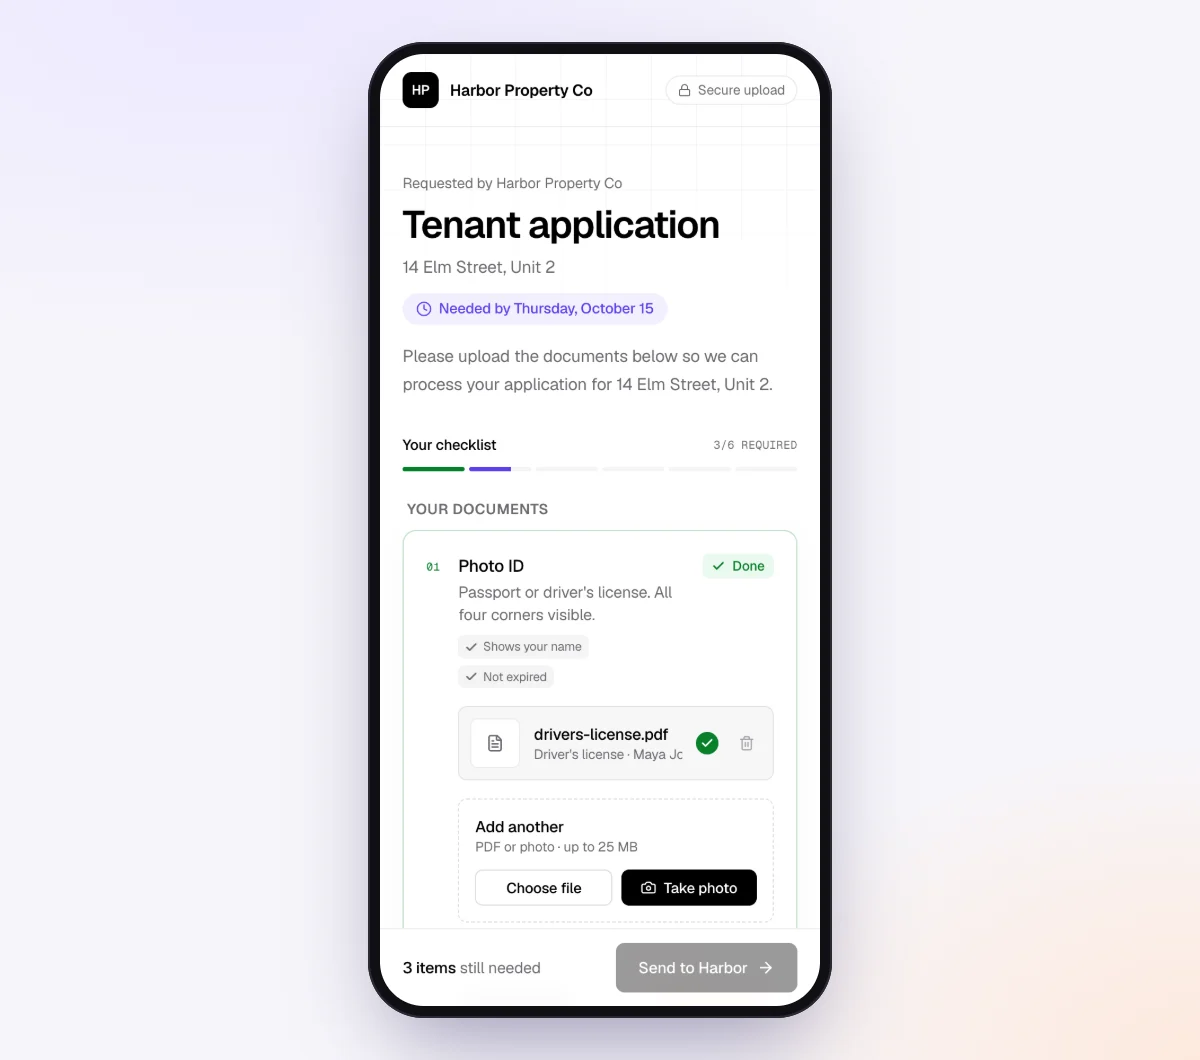
Each photo is checked in seconds by document checks. A dark, blurry or cut-off photo, or the hallway uploaded under "Kitchen," gets a friendly note so the tenant can retake it on the spot.
6. Review, compare and keep the set
Your request page shows every photo with its check result, what is missing, the tenant's notes and an activity timeline of emails and uploads. Use "Ask for changes" on a single photo if you need a better angle. Then download the ZIP and save it with the lease, or on Pro send it to Google Drive or a webhook.
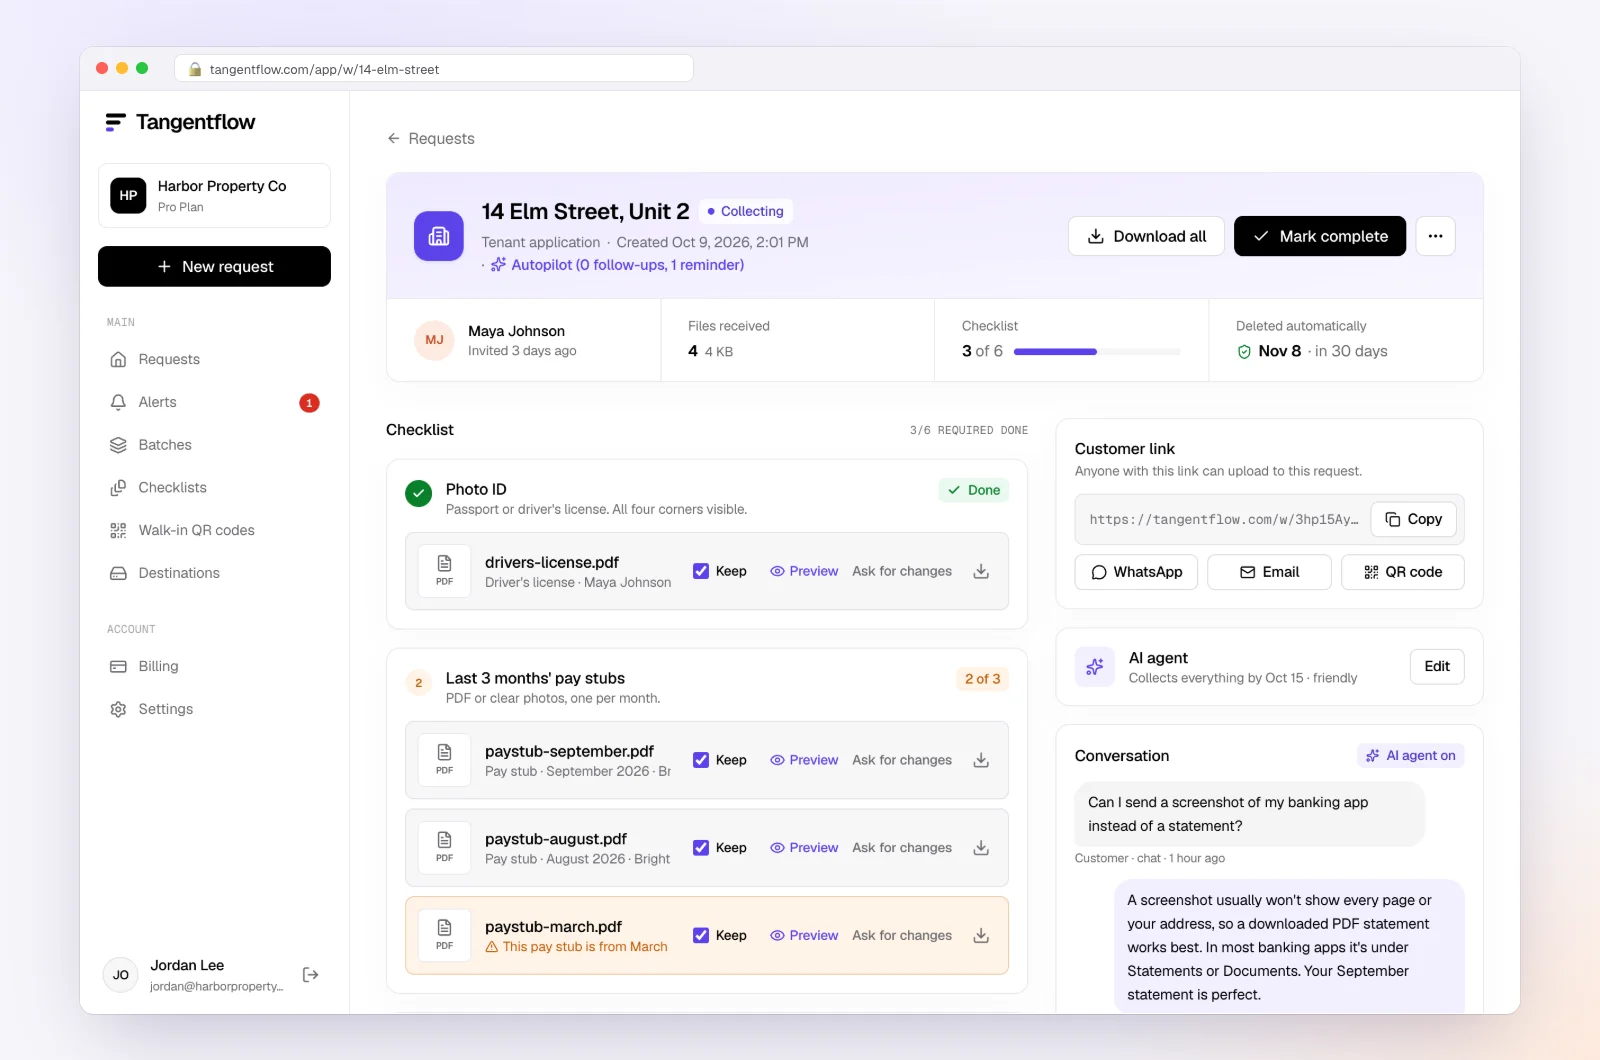
At move-out, send a second request from the same checklist. Two packages organized by the same room names make the comparison quick.
Setups by property type
| Property type | Key items to add to the template | Settings worth turning on | Learn more |
|---|---|---|---|
| Apartments and condos | Entry, laundry, balcony, parking space, storage locker, keys and fobs | "Only ask if…" for balcony and storage, "Require an email code" | Property management |
| Single-family homes | Exterior from each side, yard, garage, driveway, basement, mechanical room | Section headings for "Inside" and "Outside," a video walkthrough item | Property management |
| Furnished rentals | Each piece of furniture, mattress, linens, dishes and small appliances | Higher counts on bedrooms and kitchen, an attached inventory list to sign | Forms and e-signatures |
| Student housing | Each bedroom by room number, shared kitchen and bathroom, keys | One request per tenant, bulk sending at the start of term | Bulk requests |
For a whole building, "Batches" sends the same checklist to many tenants from a spreadsheet. That is a Pro workflow, since Free allows one open request at a time.
When something goes wrong
| Problem | Likely cause | Fix |
|---|---|---|
| Move-out photos do not match move-in | Different order and angles | Use the same room list and order both times, and bring the move-in photos on the walk |
| Photos are too dark to show stains | Lights off, blinds closed, evening walk | Ask for all lights on and blinds open; add it as a tip on every room |
| Tenant never sent move-in photos | No deadline or reminder | Set a needed-by date and let reminders run; note on the report that the chance was offered |
| Photo dates look wrong | Phone clock off, or metadata stripped by texting | Keep originals, keep the upload or email record, and have the date said aloud in the video |
| Tenant moved away before the final inspection | Out-of-town move or tight timing | Ask for a remote move-out set before key return, then do your own inspection right away |
| Link went to the wrong email address | Typo when creating the request | Reset the tenant's link from the request |
| Deposit deadline almost passed | Repairs and invoices took longer than expected | Calendar the deadline on move-out day; where allowed, send a good-faith estimate on time |
For wording non-experts follow, see how to ask customers for photos. For damage after a flood or fire, see the insurance claim documentation checklist.
Free and Pro, honestly
You can run a real move-in photo request without paying anything.
| Free | Pro ($29/month) | |
|---|---|---|
| Open requests | 1 at a time | Unlimited |
| AI check on each file | Yes | Yes |
| AI autopilot (answers, reminders, follow-ups) | Your first request | Every request |
| Clients reply by email with attachments | No | Yes |
| Branding | Tangentflow badge | Your logo |
| Delivery to Google Drive or a webhook | No | Yes |
| Works with AI assistants (MCP) | No | Yes |
| File retention | 7 days | 60 days |
Both plans include unlimited checklists, QR codes and posters, ZIP export, AI summaries and email delivery. Pro is billed monthly with no contract, and you can cancel any time. Full details on the pricing page.
What Tangentflow does not do: SMS or text messages, a native mobile app, full legal e-signature certificates, identity verification, collecting payments, or permanent storage. If you need any of those, pair it with a tool that does.
The whole process as a checklist
- Look up your state, province and city deposit rules before the tenancy starts.
- Use one room-by-room list, in the same order, for move-in and move-out.
- Photograph each room wide, then each wall, the floor, inside appliances and every defect with scale.
- Record a video walkthrough that starts with the date, address and unit number.
- Have the landlord and every tenant sign and date a condition report.
- Ask the tenant to add their own photos and notes within a few days.
- Store the originals with the lease for the whole tenancy and after.
- At move-out, offer any required inspection and repeat the same photos.
- Compare room by room, separating normal wear and tear from damage.
- Send the itemized statement, receipts and any required photos before the deadline.
Frequently asked questions
What should a move-in move-out inspection checklist include?
Every room and area, from the entry, kitchen, bathrooms and bedrooms to windows, safety alarms, outdoor spaces, meter readings and keys. Photograph each one and note the condition of walls, floors, fixtures and appliances. Use the same list at move-in and move-out so the two can be compared.
How many photos should I take at move-in?
Enough to show every wall and floor of each room plus every appliance and existing defect, which for a two-bedroom apartment often means dozens of photos, plus a short video walkthrough. Missing angles are the usual problem, not too many photos.
Do move-in photos need a timestamp?
A visible timestamp is not usually required, but you need to be able to show when the photos were taken. Keep the original files, which store the date in their metadata, and back that up with a signed, dated condition report, an email or upload record, and a video that states the date. Metadata alone can be wrong or stripped.
What is normal wear and tear on a rental?
Deterioration from ordinary daily use over time, such as light scuffs, small nail holes, faded paint and carpet worn along walking paths. Damage is harm beyond that, like burns, large holes, pet stains or broken fixtures. The exact line depends on your local law and the length of the tenancy.
How long does a landlord have to return a security deposit?
It depends on location: 21 days in California, 14 in New York and 15 in British Columbia after the forwarding address arrives in writing, while Ontario does not allow damage deposits at all. Check your state or provincial housing agency for the current rule.
Can I do a move-out inspection remotely?
Yes, by asking the tenant to upload photos and a video walkthrough before returning the keys. Still do your own inspection and photos before cleaning or repairs, since some jurisdictions require them.
Is there a free way to try this?
Yes. The Free plan gives you one open request at a time with the full AI agent on your first request. Try it free with your next move-in, starting from the Move-in / move-out photos template.